- Joined
- Jul 22, 2018
- Messages
- 6,646
- Motherboard
- Supermicro X11SPA-T
- CPU
- Intel Xeon W-3275 28 Core
- Graphics
- 2xAMD RX 580 8GB
- OS X/macOS
- 13.x
- Bootloader
- OpenCore (UEFI)
- Mac
- Mac mini
- MacBook Pro
- Mobile Phone
- Android
- iOS
How to Map your USB Ports on macOS
An EliteMacx86 Exclusive Guide - This guide covers the mapping of USB Ports on macOS. By following this guide, you'll be able to map your USB ports and can also achieve a proper speed for your USB ports.
I. Overview
Often, the USB ports are not well recognized or have certain issues. To fix that, USBInjectAll.kext from Rehabman was serving the purpose along with the USB port limit patch. Later on, for more performance and to avoid conflicts, and issues, a custom SSDT-UIAC was introduced. Later on, when Hackintool was introduced, USBPorts.kext served the purpose for a while as the USBInjectAll.kext was no longer maintained from RehabMan and new SMBIOS were introduced where the maximum support was till MBP15,2 and iMacPro1,1. However, when it comes to AMD systems, USBInjectAll.kext isn't supported at all. A new method was introduced from corpnewt with the name of "USBMap" which is basically a python script for mapping USB ports on macOS and creating a custom USB injector kext.
II. Why USB Mapping is necessary?
USB Mapping is necessary because of the following reasons which have been mentioned below.
Since OS X 10.11 (El Capitan), Apple introduced Port Limit. Port Limit under OS X/macOS is a limitation of the number of ports per USB Controller. Apple set 15 ports per controller which work great for Apple Mac computers, however, it is an issue for non-Apple computers. By default, most Desktop boards define a significant number of USB Ports in the ACPI Table. For example, according to Intel's Skylake specs, there can be up to 24 ports and in some cases, the newer series chipset can have up to 26 ports in total. Depending on the chipset, the port specs can actually differ. For example, Intel's 8/9 series chipsets support a maximum of 14 ports. Note that USB 3.0 ports are counted twice (once at the beginning in USB 2.0 mode, then at the end in USB 3.0 mode). These are not the actual physical ports but are declared in ACPI Table and due to this, OS X/macOS cannot differentiate between a real port and one which is not removed in the ACPI tables.
You may have a question that why did Apple choose 15 ports as the limit, there is an answer to your question. Apple chooses 15 ports as a limit due to two specific reasons.
Running the above command on a typical Z370 Chipset, the output of the operation may look like below
If you're having such a limit, it can be an issue and not only it affects the speed of the USB ports but most of the USB ports (typically USB 3.0/3.1/3.2/Type-C) will not be recognized due to the fact when having more than 15 ports defined in ACPI Table, not all ports are recognized by OS X/macOS but only the first 15 ports and the rest ports remain uninitialized.
Initially, these port limit patches served for a quite long time (OS X El Capitan to macOS Catalina) but in fact, Apple is constantly changing the code, and patches for the port limit change every 2-3 minor updates. So, with the introduction of OpenCore, these port limit patches (depreciated now) were replaced by
Considering all these aspects, it is now more practical to make a plist-only (codeless) kext and is mandatory. The
The XchiPortLimit Quirk patches several USB kexts (AppleUSBXHCI.kext, AppleUSBXHCIPCI.kext, IOUSBHostFamily.kext) to remove USB port count limit of 15 ports. Using
USB port limit is imposed by the number of used bits in locationID format and there is no possible way of workaround without heavy OS modification. The only valid solution is to limit the number of used ports to 15 (discarding some).
As some of the ports are not used at all and most of the time, the users don't have a need to utilize all the physical ports given in a particular system, it is recommended to map the ports under the limit of 15 only. You should only keep those ports enabled that you need to use and remove the rest of the working/non-working ports for a good cause. In addition, once the ports are mapped, you should disable the
IV. Problematic USB Devices
Some USB devices that do not have proper support in macOS due to a lack of drivers, may cause sleep issues. These USB Devices include Water Coolers with USB Addressable Control, Internal Hubs, and RGB/ARGB/FAN Controllers. A similar situation can be also seen with Smart Power Supplies (such as Corsair). In addition, Corsair Commander Pro appears as an Uninterruptible Power Supply (UPS) on macOS and thus prevents sleep. However, it can be used in conjunction with CommanderProFix. Note that Sleep may not even work when using the CommanderProFix. If you have a similar situation, we recommend excluding these devices from mapping.
Apart from these, there are several third party controllers which can cause sleep issues even when there is official support for such controllers. However, most of such third party does not have an official drivers. All such controllers must be excluded from mapping or you can also turn off such controllers from the BIOS itself, if the option is available.
Should I Map other USB Controllers?
Normally, the mapping for Intel USB Controller is required only. Any third-party USB Controllers (such as ASMedia or Fresco Logic) do not need to be mapped unless the controller has more than 15 ports (not physical), which is a rare case. This is also valid for Intel Thunderbolt USB Controllers. You just need a proper USB implementation using a Custom SSDT so that the macOS/OS X can recognize all the ports, ensuring proper speed and power properties.
Should I Map External USB Cards?
Normally, mapping isn't required for External USB Cards. However, if the controller has more than 15 ports (not physical) and if you plan to use Big Sur 11.3 and later, you must map your External USB Cards.
I have changed my PC Case. Do I need to remap the USB ports?
As the front panel layout will be changed, you need to re-map the USB ports.
Available Methods for Mapping
Following are the methods available for USB Mapping. All these methods have been described below.
Which is the Best USB Mapping Tool?
Well, you might have this question and there is nothing wrong with it. All the above methods give the same results, however, each has its own advantages and way to map. Depending on the user, and how familiar is the user with working with community-based tools and knowledge, some may consider Hackintool as the easiest option and the advanced users may consider USBMap. As long as the mapping is done correctly, both methods will serve the purpose. However, when it comes to
mapping third-party USB Controllers (such as ASMedia), the USBMap tool would be considered as a more robust option, if you don't have a proper USB implementation for the Third Party USB Controllers. In addition, using the USBMap tool, the unused ports and USB Controllers can be disabled, as required. Hackintool should be used when no third-party USB Controllers are present.
Now, some of you may have a question that why Hackintool does not recognize the Third Party USB Controllers. The reason why Third Party USB Controllers are not recognized by Hackintool is due to improper implementation of the Third Party USB Controllers. If you have a proper implementation of the Third Party USB Controller(s), the particular USB Controller should be definitely recognized by Hackintool and you can use Hackintool to map all of your ports. Although, as mentioned above, you don't need to map any of the third-party USB Controller(s).
Requirements
- 1xUSB 2.0 Flash Drive
- 1xUSB 3.0 Flash Drive
- 1xUSB Type-C Flash Drive
Before you start mapping your USB Ports, all the ports must be detected under macOS. To fix your USB ports, follow the guide linked below

 elitemacx86.com
Also, prior to mapping the USB Ports, it is highly recommended to set up a correct SMBIOS for your system. For more information on setting up SMBIOS, refer to the guide linked below.
elitemacx86.com
Mapping USB Ports
Currently, there are two ways to Map the USB ports. Hackintool, which is very easy, and the other one is USBMap from Corpnewt. This guide includes both the method for USB Mapping.
Method #1: USB Ports Mapping using Hackintool
Using Hackintool, you can configure the ports and map the USB ports as required. To map your USB ports using Hackintool, follow the steps below.
The very first step is to discover the ports for mapping. To discover the ports, follow the steps below.
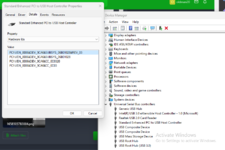
1. Download Hackintool.
2. Unlock Hackintool using the lock button.
3. Go to USB Tab and you'll see the number of ports currently available. The ports in green are the active ports that are being used.

As you can see, there are a total of 24 ports available. But those are not the actual physical ports. The physical ports are way less than that.
Before you start discovering the ports, click on the
4. Starting with USB 2.0 discovery, connect your USB 2.0 Flash Drive to each port of your system and wait for it to appear under Hackintool>USB. Once detected, eject the USB Flash Drive physically and plug it into the next available port.
After discovering the USB 2.0 ports, you'll have some ports in green. Here is the USB 2.0 ports discovery.
5. Now, as the USB 2.0 ports have been discovered, it's time to discover the USB 3.0/USB 3.1/USB 3.2 ports. Connect your USB 3.0 Flash Drive to each port of your system and wait for it to recognize by Hackintool. Once detected, eject the USB Flash Drive physically and plug it into the next available port.
After discovering the USB 3.0/USB 3.1/USB 3.2 ports, you'll have some more ports in green. Here is the USB 3.0 ports discovery.
6. Now, as the USB 3.0/USB 3.1/USB 3.2 ports have been discovered, it's time to discover the USB Type-C ports. Connect your USB Type-C Drive to each port of your system and wait for it to recognize by Hackintool. Once detected, eject the USB Flash Drive physically and plug it into the next available port.
After discovering the USB Type-C ports, you'll have some more ports in green. Here is the USB Type-C ports discovery.
7. As all the ports have been discovered, it's time to calculate the total number of ports discovered. To calculate, simply count the ports in green. In our case, it is 18.
1. To remove the unused ports, simply select the unused ports and click on the delete button. The unused ports are non-green ports.
2. Now, you should see only the active ports. To verify the active ports, match the ports count from
Changing connector types can be required. It varies from system to system. This is necessary for USB devices such as Bluetooth and Hubs. A few issues can be solved such as slow speed, crashes, and kernel panics. Changing connector types is very simple and it basically involves identifying the ports and changing them within Hackintool, without the need for anything extra. In addition, changing the connector type for Bluetooth is a must.
Connector Info
If you're using Bluetooth, you need to change the connector type for your USB Port. As macOS always expects Bluetooth as Internal, it's best to change the connector type. As per the connector table, we need to set it as Internal which is 255. You'll have to find what port is connected to Bluetooth. Normally, you can determine in Hackintool, just look in the Device column next to the USB port. However, this is not always the case. Like ours, we have the USB connected to the internal Hub and that's where our Bluetooth is. If you're having such a scenario, you can use IOReg to determine what port is connected to Bluetooth. To find the connector type for Bluetooth, follow the steps below.
1. Download IOReg
2. Open your IOReg and type Bluetooth in the search bar. You'll see something like this.

3. If you check the above screenshot, you can see that Bluetooth is connected to HS12. Note down the port number.
4. Once you have determined the port, you can simply change the connector type as per the connector info table. Select HS12 and from the connector column, click on the arrows and select Internal and you should have something like below.
Before changing:

After changing:
1. Mount your ESP.
For Clover:
If you're using Clover, copy the
For OpenCore:
If you're using OpenCore, copy the
2. Save your config.plist
1. Open Hackintool
2. Go to USB Tab and click on the Clear button and then click on Reload to refresh the ports list.
3. Now, you'll only see the discovered/mapped ports in the list. Make sure to count the ports to ensure you have no ports missed.
Here is what we have
4. Now, the last step would be to verify the ports. To verify, simply repeat STEP #1 and ensure that each and every port is working.

Method #2: USB Ports Mapping using USBMap
1. Install Command Line Tools, if you haven't already.
2. Open the Terminal and execute the following commands. When prompted, enter your password.
3. Type

4. Type
and you'll see something like below.

5. Starting with USB 2.0 discovery, connect your USB 2.0 Flash Drive to each port of your system and wait for it to appear under USBMap. Once detected, eject the USB Flash Drive physically and plug it into the next available port.
After discovering the USB 2.0 ports, you'll have some ports in green. Here is the USB 2.0 ports discovery.

6. Now, as the USB 2.0 ports have been discovered, it's time to discover the USB 3.0/USB 3.1/USB 3.2 ports. Connect your USB 3.0 Flash Drive to each port of your system and wait for it to recognize by Hackintool. Once detected, eject the USB Flash Drive physically and plug it into the next available port.
After discovering the USB 3.0/USB 3.1/USB 3.2 ports, you'll have some more ports in green. Here is the USB 3.0 ports discovery.
7. Now, as the USB 3.0/USB 3.1/USB 3.2 ports have been discovered, it's time to discover the USB Type-C ports. Connect your USB Type-C Drive to each port of your system and wait for it to recognize by Hackintool. Once detected, eject the USB Flash Drive physically and plug it into the next available port.
After discovering the USB Type-C ports, you'll have some more ports in green. Here is the USB Type-C ports discovery.
8. Once all the ports are discovered, type
1. Type
and you'll see something like below

2. Now, we need to set the connector types first. Changing connector type in USBMap is a bit different than Hackintool. However, changing the connector type is still simple even in the USBMap tool. For more info on Connector Info, see
The connector type can be changed using the syntax
Except for the Bluetooth, which has to be set as 255, as that's what macOS expects, we can set the connector types for the rest of the ports. Using the above syntax, change the connector type. It's always recommended to set one connector at one time, for X number of ports and then after different connectors for the rest of the ports. In our case, the command would be

Once you have determined the Bluetooth port, you can simply change the connector type as per the connector info table. In our case, #12.
Using the above syntax, change the connector type. In our case, the command would be
Once changed, the connector type will reflect
3. Type
4. Type
5. Finally, type

When prompted, click on OK to allow access

Now, the USBMap tool will generate the final kext. You can find the kext at
6. Press enter key to return to the main menu.
Type
2. Type
3. Quit Terminal.
1. Mount your ESP.
For Clover:
If you're using Clover, copy the
For OpenCore:
If you're using OpenCore, copy the
2. Save your config.plist
1. Copy the
2. Mount your EFI partition
3. Depending on your bootloader,
For Clover:
If you're using Clover, copy the
For OpenCore:
If you're using OpenCore, copy the
1. Run the USBMap command and type
2. Type
2. Now, you'll only see the discovered/mapped ports in the list. Make sure to count the ports to ensure you have no ports missed.
Here is what we have


Recommended Configuration for USB Mapping
The following configurations are the only valid configurations. Anything else is likely wrong and should not be used.
Hackintool:
- USBports.kext
- XHCIUnsupported.kext (If required by your System)
- RHUB SSDT (Required for 400 series and newer Motherboards)
- XhciPortLimit Quirk (If you want to use more than 15 ports. Generally not recommended)
USBMap:
- USBMap.kext
- XHCIUnsupported.kext (If required by your System)
- RHUB SSDT (If required by your System)
- XhciPortLimit Quirk (If you want to use more than 15 ports. Generally not recommended)
An EliteMacx86 Exclusive Guide - This guide covers the mapping of USB Ports on macOS. By following this guide, you'll be able to map your USB ports and can also achieve a proper speed for your USB ports.
I. Overview
Often, the USB ports are not well recognized or have certain issues. To fix that, USBInjectAll.kext from Rehabman was serving the purpose along with the USB port limit patch. Later on, for more performance and to avoid conflicts, and issues, a custom SSDT-UIAC was introduced. Later on, when Hackintool was introduced, USBPorts.kext served the purpose for a while as the USBInjectAll.kext was no longer maintained from RehabMan and new SMBIOS were introduced where the maximum support was till MBP15,2 and iMacPro1,1. However, when it comes to AMD systems, USBInjectAll.kext isn't supported at all. A new method was introduced from corpnewt with the name of "USBMap" which is basically a python script for mapping USB ports on macOS and creating a custom USB injector kext.
II. Why USB Mapping is necessary?
USB Mapping is necessary because of the following reasons which have been mentioned below.
- macOS is unable to recognize the USB ports and their type;
- Few ports run at a slower speed than their original rated speed;
- Port Type mismatch;
- Bluetooth or Webcam not working;
- Broken Sleep/Wake function.
Since OS X 10.11 (El Capitan), Apple introduced Port Limit. Port Limit under OS X/macOS is a limitation of the number of ports per USB Controller. Apple set 15 ports per controller which work great for Apple Mac computers, however, it is an issue for non-Apple computers. By default, most Desktop boards define a significant number of USB Ports in the ACPI Table. For example, according to Intel's Skylake specs, there can be up to 24 ports and in some cases, the newer series chipset can have up to 26 ports in total. Depending on the chipset, the port specs can actually differ. For example, Intel's 8/9 series chipsets support a maximum of 14 ports. Note that USB 3.0 ports are counted twice (once at the beginning in USB 2.0 mode, then at the end in USB 3.0 mode). These are not the actual physical ports but are declared in ACPI Table and due to this, OS X/macOS cannot differentiate between a real port and one which is not removed in the ACPI tables.
You may have a question that why did Apple choose 15 ports as the limit, there is an answer to your question. Apple chooses 15 ports as a limit due to two specific reasons.
- Hexadecimal system. If you convert 15 to Hexadecimal, it would be 0xF and this made more sense to stop at 15 than to expand the port limit.
- Secondly, no Macs have more than 15 ports and even if a user adds an external USB Card, it will have its own 15 port limit as the controller differs. The thumb of the rule is 15 ports per controller.
Determining Port Limit
To determine whether you have such a limit and if your system is affected, you can run the following commands in the Terminal
Code:
# For OS X 10.11
syslog | grep "ports limit reached"

#For macOS 10.12 and newer
log show --last boot | grep "ports limit reached"
Running the above command on a typical Z370 Chipset, the output of the operation may look like below
Code:
XHC @14000000: AppleUSBXHCIPCI::createPorts: ports limit reached. Not creating the remaining 6 portsIf you're having such a limit, it can be an issue and not only it affects the speed of the USB ports but most of the USB ports (typically USB 3.0/3.1/3.2/Type-C) will not be recognized due to the fact when having more than 15 ports defined in ACPI Table, not all ports are recognized by OS X/macOS but only the first 15 ports and the rest ports remain uninitialized.
Port Limit Patches
To get around this port limit issue, a workaround was discovered back then, which was to use a Kernel Patch (known as Port Limit Patch) to increase the port limit to 26 so that OS X/macOS can initialize more ports instead of 15. You can increase it to the desired number using a patch. Still, mapping was considered the best option as it is now, however, this served lazy users who didn't want to go through the long process of mapping.
Code:
#For OS X El Capitan (10.11.x)

Name: com.apple.driver.usb.AppleUSBXHCIPCI
Find: 83BD8CFE FFFF10
Replace: 83BD8CFE FFFF1B
Comment: change 15 port limit to 26 in XHCI kext
Code:
#For macOS Sierra (10.12.x)

Name: com.apple.driver.usb.AppleUSBXHCIPCI
Find: 83BD74FF FFFF10
Replace: 83BD74FF FFFF1B
Comment: change 15 port limit to 26 in XHCI kext
Code:
#For macOS High Sierra (10.13.0, 10.13.1, 10.13.2, 10.13.3)

Name: com.apple.driver.usb.AppleUSBXHCIPCI
Find: 837D8C10
Replace: 837D8C1B
Comment: change 15 port limit to 26 in XHCI kext
Code:
#For macOS High Sierra (10.13.4, 10.13.5)

Name: com.apple.driver.usb.AppleUSBXHCI
Find: 837D940F 0F839704 0000
Replace: 837D940F 90909090 9090
Comment: disable port limit in XHCI kext (credit PMHeart)

Name: com.apple.driver.usb.AppleUSBXHCI
Find: 837D940F 0F839704
Replace: 837D941A 0F839704
Comment: change 15 port limit to 26 in XHCI kext (credit FredWst)
Code:
#For macOS High Sierra (10.13.6)

Name: com.apple.driver.usb.AppleUSBXHCI
Find: 837D880F 0F83A704 0000
Replace: 837D880F 90909090 9090
Comment: disable port limit in XHCI kext (credit RehabMan, based prior PMHeart patch)
Code:
#For macOS Mojave (10.14.x)

Name: com.apple.iokit.IOUSBHostFamily
Find: 83FB0F0F
Replace: 83FB3F0F
Comment: USB port limit patch #1/4 10.14.x modify by DalianSky (credit ydeng)

Name: com.apple.iokit.IOUSBHostFamily
Find: 83E30FD3
Replace: 83E33FD3
Comment: UUSB port limit patch #2/4 10.14.x modify by DalianSky (credit PMHeart)

Name: com.apple.driver.usb.AppleUSBXHCI
Find: 83FB0F0F
Replace: 83FB3F0F
Comment: USB Port limit patch #3/4 10.14.x modify by DalianSky (credit PMheart)

Name: com.apple.driver.usb.AppleUSBXHCI
Find: 83FF0F0F
Replace: 83FF3F0F
Comment: USB Port limit patch #4/4 10.14.x modify by DalianSky (credit PMheart)
Code:
#For macOS Catalina (10.15.x)

Name: com.apple.iokit.IOUSBHostFamily
Find: 83FB0F0F
Replace: 83FB3F0F
Comment: USB Port limit patch #1/2 10.15.x (credit DalianSky)

Name: com.apple.driver.usb.AppleUSBXHCI
Find: 83FB0F0F
Replace: 83FB3F0F
Comment: USB Port limit patch #2/2 10.15.x (credit DalianSky)
Initially, these port limit patches served for a quite long time (OS X El Capitan to macOS Catalina) but in fact, Apple is constantly changing the code, and patches for the port limit change every 2-3 minor updates. So, with the introduction of OpenCore, these port limit patches (depreciated now) were replaced by
XhciPortLimit Quirk and it worked well till macOS Big Sur 11.2.3. This means up to macOS Big Sur 11.2.3, it was possible to bypass the port limit where you can have more than 15 ports. But since Big Sur 11.3, Apple made some changes to its USB implementation. With the new re-written drivers, the port limit was broken and it was limited back to 15 only. This simply means that on Big Sur 11.3 and later, you cannot have more than 15 ports. Due to this, some users have either all 2.0 ports or 3.0 only or a mixed combination (if using XhciPortLimit Quirk). However, this caused problems with Bluetooth and HID devices which use pure USB 2.0 to function. However, a workaround was to map the USB ports and use XhciPortLimit Quirk along with the mapped kext and you can have more than 15 ports on the system, however, this may not work with all systems and there can be still a port limit.Considering all these aspects, it is now more practical to make a plist-only (codeless) kext and is mandatory. The
XhciPortLimit Quirk can be really helpful (up to macOS Big Sur 11.2.3) when combined with USBInjectAll and XHCIUnsupported (where applicable) to discover the ports for mapping. This will allow you to discover all ports in one go. However, this is limited up to macOS Big Sur 11.2.3 only. For the latter, you need to go through 2 rounds for mapping 2.0 and 3.0/3.1/Type-C ports respectively. Note that this combination should not be used in a production environment even if you're using (up to macOS Big Sur 11.2.3) but it is only intended for discovering ports for mapping purposes.The XchiPortLimit Quirk patches several USB kexts (AppleUSBXHCI.kext, AppleUSBXHCIPCI.kext, IOUSBHostFamily.kext) to remove USB port count limit of 15 ports. Using
XchiPortLimit Quirk, it can bypass the port limit, sounds amazing yeah? But let's see what could happen if you use XhciPortLimit Quirk. Technically, this Quirk can cause data corruption as this quirk tries to push the 0xF limit and therefore enters someone else's space. It is strongly recommended to avoid this quirk when possible.USB port limit is imposed by the number of used bits in locationID format and there is no possible way of workaround without heavy OS modification. The only valid solution is to limit the number of used ports to 15 (discarding some).
QUICK INFO:
- Since Big Sur 11.3, the XHCIPortLimit patch is broken, so you need to have 2 rounds to map the ports. First with
XHCIPortLimit disabledto map the USB 2.0 ports. Second withXHCIPortLimit enabledto map the USB 3.0/3.1/Type-C ports. If you don't want to have 2 rounds, use Big Sur 11.2.3 (max) to map all the ports at once.- It is recommended to use Big Sur 11.2.3 for mapping the Ports due to the broken
XhciPortLimitQuirk. By using Big Sur 11.2.3, you don't need to switch between theXhciPortLimitQuirk to discover the ports.- Starting with OpenCore v0.9.3, the XhciPortLimit Quirk is improved and now it's possible to map the 2.0 and 3.0/3.1/3.2/Type-C ports in one go.
As some of the ports are not used at all and most of the time, the users don't have a need to utilize all the physical ports given in a particular system, it is recommended to map the ports under the limit of 15 only. You should only keep those ports enabled that you need to use and remove the rest of the working/non-working ports for a good cause. In addition, once the ports are mapped, you should disable the
XhciPortLimit Quirk and avoid the use of USBInjectAll. As a reminder again, this combination should not be used in a production environment even if you're using (up to macOS Big Sur 11.2.3) but it is only intended for initial mapping purposes. This applies to macOS Big Sur 11.3 and later as well. For demonstration, this guide provides the mapping instructions with port limits bypassed (if a user needs them in a rare case) and under 15 port limits.IV. Problematic USB Devices
Some USB devices that do not have proper support in macOS due to a lack of drivers, may cause sleep issues. These USB Devices include Water Coolers with USB Addressable Control, Internal Hubs, and RGB/ARGB/FAN Controllers. A similar situation can be also seen with Smart Power Supplies (such as Corsair). In addition, Corsair Commander Pro appears as an Uninterruptible Power Supply (UPS) on macOS and thus prevents sleep. However, it can be used in conjunction with CommanderProFix. Note that Sleep may not even work when using the CommanderProFix. If you have a similar situation, we recommend excluding these devices from mapping.
Apart from these, there are several third party controllers which can cause sleep issues even when there is official support for such controllers. However, most of such third party does not have an official drivers. All such controllers must be excluded from mapping or you can also turn off such controllers from the BIOS itself, if the option is available.
Should I Map other USB Controllers?
Normally, the mapping for Intel USB Controller is required only. Any third-party USB Controllers (such as ASMedia or Fresco Logic) do not need to be mapped unless the controller has more than 15 ports (not physical), which is a rare case. This is also valid for Intel Thunderbolt USB Controllers. You just need a proper USB implementation using a Custom SSDT so that the macOS/OS X can recognize all the ports, ensuring proper speed and power properties.
Should I Map External USB Cards?
Normally, mapping isn't required for External USB Cards. However, if the controller has more than 15 ports (not physical) and if you plan to use Big Sur 11.3 and later, you must map your External USB Cards.
I have changed my PC Case. Do I need to remap the USB ports?
As the front panel layout will be changed, you need to re-map the USB ports.
Available Methods for Mapping
Following are the methods available for USB Mapping. All these methods have been described below.
| Method | Notes |
|---|---|
| Hackintool |
|
| USBMap |
|
| USBToolBox |
|
NOTE:
- None of the above methods bypasses the port limit.
Which is the Best USB Mapping Tool?
Well, you might have this question and there is nothing wrong with it. All the above methods give the same results, however, each has its own advantages and way to map. Depending on the user, and how familiar is the user with working with community-based tools and knowledge, some may consider Hackintool as the easiest option and the advanced users may consider USBMap. As long as the mapping is done correctly, both methods will serve the purpose. However, when it comes to
mapping third-party USB Controllers (such as ASMedia), the USBMap tool would be considered as a more robust option, if you don't have a proper USB implementation for the Third Party USB Controllers. In addition, using the USBMap tool, the unused ports and USB Controllers can be disabled, as required. Hackintool should be used when no third-party USB Controllers are present.
Now, some of you may have a question that why Hackintool does not recognize the Third Party USB Controllers. The reason why Third Party USB Controllers are not recognized by Hackintool is due to improper implementation of the Third Party USB Controllers. If you have a proper implementation of the Third Party USB Controller(s), the particular USB Controller should be definitely recognized by Hackintool and you can use Hackintool to map all of your ports. Although, as mentioned above, you don't need to map any of the third-party USB Controller(s).
Requirements
- 1xUSB 2.0 Flash Drive
- 1xUSB 3.0 Flash Drive
- 1xUSB Type-C Flash Drive
Before you start mapping your USB Ports, all the ports must be detected under macOS. To fix your USB ports, follow the guide linked below
GUIDE - How to Fix USB Ports on macOS
How to Fix USB Ports on macOS This guide covers fixing of USB Ports on macOS. By following this guide, you'll be able to fix your USB Ports on macOS. This guide is applicable for both Desktops and Laptops and supports Clover and OpenCore Bootloader. Overview When using macOS, the USB ports...
Also, prior to mapping the USB Ports, it is highly recommended to set up a correct SMBIOS for your system. For more information on setting up SMBIOS, refer to the guide linked below.
GUIDE - How to Setup Correct SMBIOS [Clover/OpenCore]
How to Setup Correct SMBIOS [Clover/OpenCore] This guide covers setting up a Correct SMBIOS for Intel and AMD CPUs on macOS using Clover and OpenCore. By following this guide, you'll be able to set up the correct SMBIOS on your system using Clover or OpenCore Bootloader. I. What is SMBIOS...
Mapping USB Ports
Currently, there are two ways to Map the USB ports. Hackintool, which is very easy, and the other one is USBMap from Corpnewt. This guide includes both the method for USB Mapping.
Method #1: USB Ports Mapping using Hackintool
Using Hackintool, you can configure the ports and map the USB ports as required. To map your USB ports using Hackintool, follow the steps below.
STEP 1: Ports Discovery
The very first step is to discover the ports for mapping. To discover the ports, follow the steps below.
1. Download Hackintool.
2. Unlock Hackintool using the lock button.
3. Go to USB Tab and you'll see the number of ports currently available. The ports in green are the active ports that are being used.

As you can see, there are a total of 24 ports available. But those are not the actual physical ports. The physical ports are way less than that.
Before you start discovering the ports, click on the
clean/wipe button to clear all the listed ports and then click on the reload button to reload the ports. This might be useful if you have used Hackintool to map the ports earlier.4. Starting with USB 2.0 discovery, connect your USB 2.0 Flash Drive to each port of your system and wait for it to appear under Hackintool>USB. Once detected, eject the USB Flash Drive physically and plug it into the next available port.
NOTES:
- The active ports will be marked as "Green." You can also use Finder or Disk Utility to check if your USB Device appears or not.
- Ports connected to the Hub will not be recognized as an individual port in Hackintool as all such ports connected to a Hub will appear as a single USB Hub in Hackintool. You must use IOReg/Finder/Disk Utility to confirm the detection of the USB.
After discovering the USB 2.0 ports, you'll have some ports in green. Here is the USB 2.0 ports discovery.

5. Now, as the USB 2.0 ports have been discovered, it's time to discover the USB 3.0/USB 3.1/USB 3.2 ports. Connect your USB 3.0 Flash Drive to each port of your system and wait for it to recognize by Hackintool. Once detected, eject the USB Flash Drive physically and plug it into the next available port.
NOTES:
- The active ports will be marked as "Green." You can also use Finder or Disk Utility to check if your USB Device appears or not.
- Ports connected to the Hub will not be recognized as an individual port in Hackintool as all such ports connected to a Hub will appear as a single USB Hub in Hackintool. You must use IOReg/Finder/Disk Utility to confirm the detection of the USB.
After discovering the USB 3.0/USB 3.1/USB 3.2 ports, you'll have some more ports in green. Here is the USB 3.0 ports discovery.

6. Now, as the USB 3.0/USB 3.1/USB 3.2 ports have been discovered, it's time to discover the USB Type-C ports. Connect your USB Type-C Drive to each port of your system and wait for it to recognize by Hackintool. Once detected, eject the USB Flash Drive physically and plug it into the next available port.
NOTES:
- If you have any USB Device which uses USB 2.0 bus but still has a Type-C interface, you must map such Type-C ports as devices with USB 2.0 bus speed and Type-C interface will usually connect to the HSXX port.
- The active ports will be marked as "Green." You can also use Finder or Disk Utility to check if your USB Device appears or not.
- Ports connected to the Hub will not be recognized as an individual port in Hackintool as all such ports connected to a Hub will appear as a single USB Hub in Hackintool. You must use IOReg/Finder/Disk Utility to confirm the detection of the USB.
After discovering the USB Type-C ports, you'll have some more ports in green. Here is the USB Type-C ports discovery.

7. As all the ports have been discovered, it's time to calculate the total number of ports discovered. To calculate, simply count the ports in green. In our case, it is 18.
NOTES:
- For macOS Big Sur 11.3 and later, it is recommended to disable
XhciPortLimitQuirk to discover USB 2.0 Ports and then enableXchiPortLimitQuirk to discover USB 3.0/3.1 and Type-C Ports. You must restart the system for changes.- If a port is not detected/discovered, the particular port(s) will be skipped and the respective ports will not work.
STEP 2: Removing Unused Ports
Now, as we have the total number of discovered ports, it's time to remove the unused ports.1. To remove the unused ports, simply select the unused ports and click on the delete button. The unused ports are non-green ports.

2. Now, you should see only the active ports. To verify the active ports, match the ports count from
Step 7, and what's left are the final ports we need.
STEP 3: Changing Connector Types
Changing connector types can be required. It varies from system to system. This is necessary for USB devices such as Bluetooth and Hubs. A few issues can be solved such as slow speed, crashes, and kernel panics. Changing connector types is very simple and it basically involves identifying the ports and changing them within Hackintool, without the need for anything extra. In addition, changing the connector type for Bluetooth is a must.
Connector Info
| Type | Connector Info | Notes |
|---|---|---|
| 0 | USB 2.0 Type-A connector | |
| 3 | USB 3.0 Type-A connector | |
| 8 | Type C connector, USB 2.0 only | |
| 9 | Type C connector, with USB 2.0 and USB 3.0 switch | |
| 10 | Type C connector - USB 2.0 and USB 3.0 without Switch | |
| 255 | Proprietary connector |
|
If you're using Bluetooth, you need to change the connector type for your USB Port. As macOS always expects Bluetooth as Internal, it's best to change the connector type. As per the connector table, we need to set it as Internal which is 255. You'll have to find what port is connected to Bluetooth. Normally, you can determine in Hackintool, just look in the Device column next to the USB port. However, this is not always the case. Like ours, we have the USB connected to the internal Hub and that's where our Bluetooth is. If you're having such a scenario, you can use IOReg to determine what port is connected to Bluetooth. To find the connector type for Bluetooth, follow the steps below.
1. Download IOReg
2. Open your IOReg and type Bluetooth in the search bar. You'll see something like this.

3. If you check the above screenshot, you can see that Bluetooth is connected to HS12. Note down the port number.
4. Once you have determined the port, you can simply change the connector type as per the connector info table. Select HS12 and from the connector column, click on the arrows and select Internal and you should have something like below.

Before changing:

After changing:


STEP 4: Creating USB Mapping Kext
Now, the next step is to create the mapped kext which has everything set. To create the kext, you just need to export the kext using Hackintool. To export, simply click on the Export button and it will generate Kext and SSDTs to your Desktop.STEP 5: Installing Mapped Kext
Now, as you have mapped the ports, you'll need to install the mapped kext to enable the USB mapping. To install the kext, follow the steps below.1. Mount your ESP.
For Clover:
If you're using Clover, copy the
USBPorts.kext to EFI/Clover/Kext/OthersFor OpenCore:
If you're using OpenCore, copy the
USBPorts.kext to EFI/OC/Kexts. You'll also need to add the kext entry in the Kernel section of your config.plist2. Save your config.plist
STEP 6: Restart your System
After performing all the above steps, restart your system for the applied changes to take effect. It is recommended to reset NVRAM twice at least.STEP 7: Verifying USB Ports
The next step is to verify the ports mapped. To verify the ports, follow the steps below.1. Open Hackintool
2. Go to USB Tab and click on the Clear button and then click on Reload to refresh the ports list.
3. Now, you'll only see the discovered/mapped ports in the list. Make sure to count the ports to ensure you have no ports missed.
Here is what we have

4. Now, the last step would be to verify the ports. To verify, simply repeat STEP #1 and ensure that each and every port is working.

On macOS Big Sur 11.6.5

NOTE:
- If you change the SMBIOS, you must change the SMBIOS model in the mapped kext or the system will throw a Kernel Panic. Therefore, it is strongly recommended to set appropriate SMBIOS before mapping.
Method #2: USB Ports Mapping using USBMap
STEP 1: Ports Discovery
The next step is to discover the ports for mapping. To discover the ports, follow the steps below.1. Install Command Line Tools, if you haven't already.
2. Open the Terminal and execute the following commands. When prompted, enter your password.
Bash:
#Clone USBMap Tool
git clone https://github.com/corpnewt/USBMap
#Move to the directory
cd USBMap
#Modify permission
chmod +x USBMap.command
#Run USBMap Tool
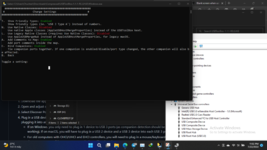
./USBMap.command3. Type
R and press enter key to reset all the discovered ports. This might be useful if you have used the script earlier.
4. Type
D and press enter key to discover the ports.
and you'll see something like below.

5. Starting with USB 2.0 discovery, connect your USB 2.0 Flash Drive to each port of your system and wait for it to appear under USBMap. Once detected, eject the USB Flash Drive physically and plug it into the next available port.
After discovering the USB 2.0 ports, you'll have some ports in green. Here is the USB 2.0 ports discovery.

6. Now, as the USB 2.0 ports have been discovered, it's time to discover the USB 3.0/USB 3.1/USB 3.2 ports. Connect your USB 3.0 Flash Drive to each port of your system and wait for it to recognize by Hackintool. Once detected, eject the USB Flash Drive physically and plug it into the next available port.
After discovering the USB 3.0/USB 3.1/USB 3.2 ports, you'll have some more ports in green. Here is the USB 3.0 ports discovery.

7. Now, as the USB 3.0/USB 3.1/USB 3.2 ports have been discovered, it's time to discover the USB Type-C ports. Connect your USB Type-C Drive to each port of your system and wait for it to recognize by Hackintool. Once detected, eject the USB Flash Drive physically and plug it into the next available port.
After discovering the USB Type-C ports, you'll have some more ports in green. Here is the USB Type-C ports discovery.

8. Once all the ports are discovered, type
Q and press enter key to quit the discovery of the ports.
NOTES:
- For macOS Big Sur 11.3 and later, it is recommended to disable
XhciPortLimitQuirk to discover USB 2.0 Ports and then enableXchiPortLimitQuirk to discover USB 3.0/3.1 and Type-C Ports. You must restart the system for changes.- If a port is not detected/discovered, the particular port(s) will be skipped and the respective ports will not work.
STEP 2: Edit and Create Kext
The next step is to edit the USB configuration and create USBMap.kext. To edit and create kext, follow the steps below.1. Type
P and press enter key to edit and create USBMap.kext
and you'll see something like below

2. Now, we need to set the connector types first. Changing connector type in USBMap is a bit different than Hackintool. However, changing the connector type is still simple even in the USBMap tool. For more info on Connector Info, see
Changing Connector Types in STEP #3 of the Hackintool Method.The connector type can be changed using the syntax
T:X,X:Y, whereX represents the discovered port number
Y represents the connector type you want to setExcept for the Bluetooth, which has to be set as 255, as that's what macOS expects, we can set the connector types for the rest of the ports. Using the above syntax, change the connector type. It's always recommended to set one connector at one time, for X number of ports and then after different connectors for the rest of the ports. In our case, the command would be
T:2,3,4,7,8,9,10,11,13,17,18,19,20,21,22,23,24:3
Once you have determined the Bluetooth port, you can simply change the connector type as per the connector info table. In our case, #12.
Using the above syntax, change the connector type. In our case, the command would be
T:12:255
Once changed, the connector type will reflect

3. Type
P and press enter key to enable all populated ports
4. Type
D and press enter key to disable all empty ports
5. Finally, type
K and press enter key to build USBMap.kext

When prompted, click on OK to allow access

Now, the USBMap tool will generate the final kext. You can find the kext at
yourusername/USBMap>Results
6. Press enter key to return to the main menu.

Type
M and press enter key.STEP 3: Create SSDT
1. TypeH and press enter key to generate SSDT to reset RHUBs.

2. Type
Q and press enter key to quit the USBMap tool.

3. Quit Terminal.
NOTE:
- SSDT-RHUB is required for 400 series and newer Motherboards only.
- You can find the RHUB SSDT at
Yourusername/USBMap/Resultsdirectory.
STEP 4: Compiling SSDT
The next step is to compile the SSDT. To compile the SSDT, follow the guide linked below.STEP 5: Installing Mapped Kext
Now, as you have mapped the ports, you'll need to install the mapped kext to enable the USB mapping. To install the kext, follow the steps below.1. Mount your ESP.
For Clover:
If you're using Clover, copy the
USBPorts.kext to EFI/Clover/Kext/Others directory.For OpenCore:
If you're using OpenCore, copy the
USBPorts.kext to EFI/OC/Kexts directory. You'll also need to add the kext entry in the Kernel section of your config.plist2. Save your config.plist
STEP 6: Installing SSDT
The next step is to install the SSDT. This is required for users who have a conflicting controller and require SSDT-RHUB. To install the SSDT, follow the steps below.1. Copy the
SSDT-RHUB.aml.2. Mount your EFI partition
3. Depending on your bootloader,
For Clover:
If you're using Clover, copy the
SSDT-RHUB.aml to EFI/Clover/ACPI/patched directory.For OpenCore:
If you're using OpenCore, copy the
SSDT-RHUB.aml to EFI/OC/ACPI directory. You'll also need to add the ACPI entries in ACPI>Add section of your config.plist
STEP 7: Restart your System
After performing all the above steps, restart your system for the applied changes to take effect. It is recommended to reset NVRAM twice at least.STEP 8: Verifying USB Ports
The next step is to verify the ports mapped. To verify the ports, follow the steps below.1. Run the USBMap command and type
R and press enter key.
2. Type
D and press enter key to discover the ports.
2. Now, you'll only see the discovered/mapped ports in the list. Make sure to count the ports to ensure you have no ports missed.
Here is what we have

On macOS Big Sur 11.6.5

NOTE:
- If you change the SMBIOS, you must change the SMBIOS model in the mapped kext or the system will throw a Kernel Panic. Therefore, it is strongly recommended to set appropriate SMBIOS before mapping.
Recommended Configuration for USB Mapping
The following configurations are the only valid configurations. Anything else is likely wrong and should not be used.
Hackintool:
- USBports.kext
- XHCIUnsupported.kext (If required by your System)
- RHUB SSDT (Required for 400 series and newer Motherboards)
- XhciPortLimit Quirk (If you want to use more than 15 ports. Generally not recommended)
USBMap:
- USBMap.kext
- XHCIUnsupported.kext (If required by your System)
- RHUB SSDT (If required by your System)
- XhciPortLimit Quirk (If you want to use more than 15 ports. Generally not recommended)
NOTES:
USBInjectAll.kextisn't required once you have mapped your ports.XHCIUnsupported.kextwill be required if your System has an unsupported XHCI Controller, regardless of mapping. As with some systems, the mapped kext fails to recognize the ports.- Do NOT use SSDT-UIAC or USBInjectAll.kext along with USBPorts.kext or USBMap.kext.
- If you plan to use 15 ports or below, keep
XhciPortLimitQuirk disabled which is the recommended way and if you plan to use more than 15 ports, enable theXhciPortLimitQuirk. Prior to enablingXhciPortLimitQuirk, make sure to include the other ports or it will not work. Read Port Limit for more information.
Last edited: