• Become a Premium Member for $25/year with no ads to improve your community experience.

EliteMacx86

Administrator
Staff member
Joined
Jul 22, 2018
Messages
6,637
Motherboard
Supermicro X11SPA-T
CPU
Intel Xeon W-3275 28 Core
Graphics
2xAMD RX 580 8GB
OS X/macOS
13.x
Bootloader
  1. OpenCore (UEFI)
Mac
  1. Mac mini
  2. MacBook Pro
Mobile Phone
  1. Android
  2. iOS
How to Install macOS Big Sur on Unsupported Mac Pro

An EliteMacx86 Exclusive Guide - This guide covers a clean installation of macOS Big Sur on Unsupported Mac Pro, unofficially. The guide supports Mac Pro3,1, Mac Pro4,1 and MacPro5,1.

Overview


Recently, Apple announced their new macOS lineup i.e macOS Big Sur 11.0 which is Apple's newest and most awaited OS. Catalina adding massive updates and improvements from its predecessor, Mojave.

Packed with new features and functionality, the most noticeable update can be seen and experienced is the new GUI. Featuring a much more "iOS" look and feel and as smooth as butter. With each release of macOS, Apple remove supports for old hardware.

Unfortunately, with the the release of macOS Big Sur, Apple has officially dropped support for Mac Pro 2008, 2009, and Late 2012. Luckily, for our fans and readers though, we're going to provide you a complete installation guide step-by-step.

If you've made and attempt to install macOS Big Sur before reading this guide, you've probably been greeted with the prohibited or no-entry sign immediately after booting from the Big Sur installer.

With this in mind, you'll have to use other way to get macOS Big Sur on your unsupported Mac Pro. Previously, Dosdude, did an excellent job for running macOS on unsupported Macs. From macOS Sierra to Catalina. As there's no any work for macOS Big Sur from Dosdude, a thread is available by him which is linked below.
macOS Big Sur Compatibility


Mac Pro (Late 2013) and later Mac Pro models supports macOS Big Sur, natively. Refer to the chart below to confirm the compatibility of your Mac Pro.

ModelSMBIOSmacOS Big Sur Support
Mac Pro (Mid 2006)MacPro1,1❌
Mac Pro (Early 2007)MacPro2,1❌
Mac Pro (Early 2008)*MacPro3,1*❎
Mac Pro (Early 2009)*MacPro4,1*❎
Mac Pro (Mid 2012)*MacPro5,1*❎
Mac Pro (Late 2013)MacPro6,1
Mac Pro (2019)MacPro7,1


❌ = Completely unsupported in any means.

❎ = Unofficially supported

= Officially supported.

Note:
  • *Requires a Metal-compatible GPU and an upgraded WiFi/BT Card.

Have another Mac model and want to run macOS Big Sur? You can find the complete list of supported Mac models for macOS Big Sur and check whether your Mac model is listed. The compatibility list is linked below.

Have another Unsupported Mac other than a Mac Pro and want to run macOS Big Sur? Check out our exclusive installation guide for Unsupported iMac and Mac mini below.

For Unsupported iMac

For Mac mini

Requirements


Before you start with this guide, here are the requirements for setting up macOS Big Sur on your unsupported Mac Pro.

Mac ProEarly 2008, Early 2009 and Mid 2012
Boot ROM Version144.0.0.0.0*
Graphics CardAny Metal-Compatible supported Graphics Card

To confirm whether you have a supported and Metal-compatible Graphics, check the GPU compatibility below.

For NVIDIA

For AMD

If you meet all the above requirements, you're good to go and can start with the guide.

The next steps are continued in the post #2 of this thread for continuing with the preparing and patching the USB installer.
 
Last edited:
How to Install macOS Big Sur on Unsupported Mac Pro

Create a Backup of your Mac


Before you proceed with the installation, we advise you to perform a backup of your Mac. In case the installation fails or you encounter any issue with the installation, you can roll back to your existing installation.

To create Backup for your Mac, follow the guide below

Download macOS Big Sur


The next step is to download macOS Big Sur. Normally, you won't be able to get new updates as you're using unsupported Mac and Apple will block updates for new OS. However, there's another workaround available and you can download the copy of macOS Big Sur very easily. To download macOS Big Sur, follow the guide below

Creating macOS Big Sur Bootable USB


After downloading macOS Big Sur, the next step is to create the Bootable USB for macOS Big Sur. To create macOS Big Sur Bootable USB, follow the guide below

Note:
As you've already downloaded macOS Big Sur, so just continue with the createinstallmedia step to create your Bootable USB


Preparing the USB Installer


The next step is to prepare the USB installer for booting macOS Big Sur. Before you start preparing the USB installer, check the macOS version support below for patching the USB installer.

Micropatcher Version [v0.5.1]​
macOS VersionBuild Number
macOS Big Sur 11.2.220D80
macOS Big Sur 11.2.120D75
macOS Big Sur 11.2.120D74
macOS Big Sur 11.220D64
macOS Big Sur 11.120C69
macOS Big Sur 11.0.120B50
macOS Big Sur 11.0.1 Release20B29
macOS Big Sur 11.0.1 Release Candidate 220B28
macOS Big Sur 11.020A2411
macOS Big Sur 11.0.1 Beta20B5012d
Micropatcher Version [0.4.2-v0.4.4]​
macOS VersionBuild Number
macOS Big Sur 11 Beta 1020A5395g
macOS Big Sur 11 Beta 920A5384c
macOS Big Sur Beta 11.0.1 Beta 120B5012d


Patching USB Installer
The next step is to run micropatcher to patch the USB installer. To patch your USB Installer, follow the steps below.

1. Download Micropatcher
2. Extract the Micropatcher to your Desktop
3. Open Terminal and type the commands below
Code:
/Users/yourusername/Desktop/big-sur-micropatcher-0.5.1\ 2/micropatcher.sh /Volumes/Install\ macOS\ Big\ Sur

Code:
/Users/yourusername/Desktop/big-sur-micropatcher-0.5.1\ 2/install-setvars.sh /Volumes/Install\ macOS\ Big\ Sur

Notes:
  • It's recommended to use the latest version of micropatcher to avoid issues.
  • You must replace "yourusername" with your actual username otherwise the command will not work.
  • Letters and spacings are case-sensitive.

Running setvars EFI Utility
Once you're done with the above steps, you'll need to run servars EFI utility which will allow to boot macOS Big Sur. To setup setvars on your Mac Pro, follow the steps below.

1. Restart your Mac and while restarting, hold down the option key and boot from "EFI Boot".

Note:
Once you boot from EFI boot, your Mac Pro will shut down. This is an indication that the setvars EFI utility has successfully finished making necessary changes to your Mac Pro's NVRAM settings. These changes include disabling SIP, disabling authenticated root, and enabling TRIM on non-Apple SSDs.

The next steps are continued in the post
#3 of this thread for continuing with the installation.
 
Last edited:
How to Install macOS Big Sur on Unsupported Mac Pro

Installing macOS Big Sur


Once you finish setting up setvars EFI utility, you're ready to install macOS Big Sur on your Mac Pro.

1. Start your Mac Pro and while restarting, hold down the option key and boot from "Install macOS Big Sur". The installer will load in a while.
2. When at installation screen, select your preferred language and continue
3. Select Disk Utility and continue, click on View and select Show all Devices.
4. Now select your Hard Drive or SSD on which you want to install macOS and use the following parameters to erase your drive.

OptionsValue
NameMacintosh HD
FormatAPFS
SchemeGUID Partition Map

5. Close Disk Utility
6. Select Install macOS Big Sur and continue with the options.
7. Now select Macintosh HD and click on Continue.

Note:
This will take couple of minutes and will restart at "Less than a minute is remaining". Upon completion, your Mac Pro will automatically restart and continue the installation further.


Here it ends the first phase of the installation.

8. When your Mac restarts, select Boot macOS Install from Macintosh HD and then boot.

It will continue the second phase of the installation. Upon completion, your Mac will automatically restart.

9. When you're at the welcome screen, continue with the basics options such as Keyboard setup, Network, Computer Account and Privacy settings.

Notes:
  • If you get a prohibited or no-entry sign when booting the installer, restart your Mac and boot from "EFI Boot". You need to follow the steps from "Running setvars EFI Utility" mentioned above. Make sure you boot using the "external" (yellow color) EFI boot which represents your USB Installer.
  • During the installation process, your Mac might restart several times. You might get blank screen at certain times but that's normal and the installer is still working in background.
  • The first boot maybe slower as the caches are not build yet. Once the caches are built, it will boot normally.
The next steps are continued in the post #4 of this thread for continuing with post-installation.
 
Last edited:
How to Install macOS Big Sur on Unsupported Mac Pro

Post Installation


After installation, Post Installation needs to be performed. The post installation is required to achieve the fully system functionality.
Typically, the post installation includes enabling boot from the system drive, Graphics, Network, Audio, USB Ports Mapping, and Power Management. But for a real Mac, you just need to patch kexts and setup booting from System Drive using OpenCore.

Patching Kexts
After completing the installation, you need to patch the kexts for making WiFi, BT and USB ports functional.

To patch the kexts, follow the steps below.

1. Open your USB Installer which is named as "Install macOS Big Sur."
2. From Spotlight search, find and open Terminal
3. In Terminal, type the following command below
Code:
/Volumes/Install\ macOS\ Big\ Sur/patch-kexts.sh
You should see something similar like the screenshot attached below.
4. When prompted, enter your password.
5. The script will start to patch the kexts. Once it finishes the process, you should see something similar like the screenshot attached below.
6. Quit Terminal
7. Restart your Mac Pro.
8. Press and hold down Option key during restart and boot from Macintosh HD.
9. When you're at the welcome screen, continue with the basics options such as Keyboard setup, Network, Computer Account and Privacy settings.

Note:
Letters and spacing are case-sensitive.

The next steps are continued in the post
#5 of this thread for continuing with OpenCore installation.
 
Last edited:
How to Install macOS Big Sur on Unsupported Mac Pro

Now, the installation is complete but you might have been wondering why OpenCore is needed on a real Mac? The answer is simple, your Mac Pro will lack encoding and macOS update function. To enable encoding and macOS updates, you'll need to use OpenCore. OpenCore will provide you encoding and seamless updates just like a supported Mac Pro under Software Update in System Preferences.

Preparing OpenCore Bootloader


To prepare OpenCore boot loader, you need to download OpenCore.
Download the Release folder followed by the release version.
When extracting, you'll get 4 folders which has been listed below.

DirectoriesPurpose
DocsContains documentation, change log, a sample config.plist, and ACPI Samples for OpenCore
IA32Contains OpenCore EFI, 32-bit OpenCore Boot Loader
UtilitiesContains several utilities
x64Contains OpenCore EFI, 64-bit OpenCore Boot Loader

1. Copy X64 to your working directory and follow the steps below

Adding Required Drivers
Drivers are mandatory which allows several important function and is required to boot the system. Follow the steps below to add the drivers.

Driver NameRequiredNotes
OpenCanopy.efiYES
  • Provides GUI functionality for OpenCore Boot screen. This driver is required for GUI or theme for OpenCore.
OpenRuntime.efiYES
  • Runtime driver including several other drivers merged such as ApfsDriverLoader. OpenRuntime.efi is a replacement for AptioMemoryFix.efi driver.


Note:
All the drivers can be found at: X64/EFI/OC/Drivers

Adding Required Kexts
In order to boot into the installation, you need to add the necessary kexts. Follow the steps below to place the necessary kexts.

Kext NameRequiredNotes
Lilu.kextYES
  • Provides arbitrary patching.
WhateverGreen.kextYES
  • Provides GPU patching on macOS.
  • This kext requires Lilu.kext to function
AppleMCEReporterDisablerYES
  • If you're having a Dual CPU, you'll need to use this kext.


1. Download the above kexts.
2. Extract the kexts from the RELEASE folder.
3. Copy the kexts to: /EFI/OC/Kexts

Notes
:
  • Do not download the project files. The pre-built binaries/downloads are available in the README.md section. Make sure you read it carefully.
  • Download the latest version for better support.
  • Use the kext from RELEASE folder and RELEASE.zip file.
  • Do not place unnecessary kexts here. It might prevent booting the installer.

Selecting a Config.plist File
OpenCore comes with a default config.plist file. This config.plist cannot be used to boot your Mac. You'll need to configure the config.plist according to your hardware, mainly graphics and other devices.

We've already created a separate thread on configuring your config.plist to boot the installer. Depending on your Mac model, create a config.plist according to the guide. For more information on creating a config.plist, follow the guide below.


Installing OpenCore Bootloader
1. Mount the EFI partition of your system drive.
2. Copy the EFI from your working directory to your system drive.

Booting from System Drive
This is one of the most important part as it will allow you to boot from OC from your EFI partition.

1. Download Bless OpenCore
2. Extract it.
3. Right click on Bless OpenCore and click on Open.
4. It will ask you for a password. Enter your password and click on OK and it will make the necessary changes.
5. Restart your Mac Pro

By using this method, you’ll be easily able to boot OpenCore Boot loader on your System Drive.

Note:
  • Always use right click and then run Bless OpenCore or it may fail to make the necessary changes.
  • For sometimes, the OpenCore may not start at the first boot. To verify, use Hackintool to check the Board ID. A workaround this issue is to repeat the process of Bless OpenCore.

Now you’ve successfully installed macOS Big Sur, and configured it. The installation is complete!

Enjoy macOS Big Sur on your unsupported Mac Pro :)

FAQ [Frequently Asked Questions]


Q. How can i reset PRAM?
A. Use Command+Option+P+R to reset PRAM.
Q. How can i boot into recovery?
A. Use Command+R to boot into recovery.
 
Last edited:
How to Install macOS Big Sur on Unsupported Mac Pro

Create a Backup of your Mac

Before you proceed with the installation, we advise you to perform a backup of your Mac. In case the installation fails or you encounter any issue with the installation, you can roll back to your existing installation.

To create Backup for your Mac, follow the guide below

Download macOS Big Sur
The next step is to download macOS Big Sur. Normally, you won't be able to get new updates as you're using unsupported Mac and Apple will block updates for new OS. However, there's another workaround available and you can download the copy of macOS Big Sur very easily. To download macOS Big Sur, follow the guide below

Creating macOS Big Sur Bootable USB
After downloading macOS Big Sur, the next step is to create the Bootable USB for macOS Big Sur. To create macOS Big Sur Bootable USB, follow the guide below

Note:
As you've already downloaded macOS Big Sur, so just continue with the createinstallmedia step to create your Bootable USB


Preparing the USB Installer

The next step is to prepare the USB installer for booting macOS Big Sur. Before you start preparing the USB installer, check the macOS version support below for patching the USB installer.

Micropatcher VersionmacOS Version
macOS Big Sur (20C5048l)
macOS Big Sur (20B29)
v0.5.1macOS Big Sur (20B28)
macOS Big Sur (20B5012d)
macOS Big Sur (20A5395g)
macOS Big Sur (20B28)
v0.4.2-v0.4.4macOS Big Sur (20A5395g)
macOS Big Sur (20A5384c)
macOS Big Sur (20B5012d)


Patching USB Installer
The next step is to run micropatcher to patch the USB installer. To patch your USB Installer, follow the steps below.

1. Download Micropatcher
2. Extract the Micropatcher to your Desktop
3. Open Terminal and type the commands below
Code:
/Users/yourusername/Desktop/big-sur-micropatcher-0.5.1\ 2/micropatcher.sh /Volumes/Install\ macOS\ Big\ Sur
You should see something similar like the screenshot attached below.
Code:
/Users/yourusername/Desktop/big-sur-micropatcher-0.5.1\ 2/install-setvars.sh /Volumes/Install\ macOS\ Big\ Sur
You should see something similar like the screenshot attached below.

Notes:
  • It's recommended to use the latest version of micropatcher to avoid issues.
  • You must replace "yourusername" with your actual username otherwise the command will not work.
  • Letters and spacings are case-sensitive.

Running setvars EFI Utility
Once you're done with the above steps, you'll need to run servars EFI utility which will allow to boot macOS Big Sur. To setup setvars on your Mac Pro, follow the steps below.

1. Restart your Mac and while restarting, hold down the option key and boot from "EFI Boot".

Note:
Once you boot from EFI boot, your Mac Pro will shut down. This is an indication that the setvars EFI utility has successfully finished making necessary changes to your Mac Pro's NVRAM settings. These changes include disabling SIP, disabling authenticated root, and enabling TRIM on non-Apple SSDs.

The next steps are continued in the post
#3 of this thread for continuing with the installation.
I have managed to create the USB disk, however when I try to reboot holding Option I don't see the boot selector screen - it just loads to the login screen. Any ideas?
 
I have managed to create the USB disk, however when I try to reboot holding Option I don't see the boot selector screen - it just loads to the login screen. Any ideas?
Provide the screenshot and have you patched your USB?
 
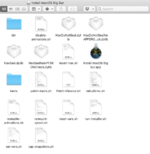
This is how the USB is looking after completing the USB patch commands from POST #2 above.
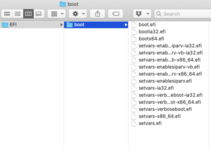
The 2nd screenshot is the EFI contents from the USB drive
 

Attachments

  • Screenshot 2021-01-08 at 21.36.03.png
    Screenshot 2021-01-08 at 21.36.03.png
    86.6 KB · Views: 502
  • Screenshot 2021-01-08 at 21.41.49.png
    Screenshot 2021-01-08 at 21.41.49.png
    48.7 KB · Views: 429
This is how the USB is looking after completing the USB patch commands from POST #2 above.
The 2nd screenshot is the EFI contents from the USB drive
And was the USB made on the target Mac?

When you press Option key during restart, with the USB plugged in, provide a screenshot for that.
 
Yes the USB was made on the target Mac. The screen is completely black initially, then the normal login window appears.
 

Forum statistics

Threads
1,479
Messages
13,997
Members
21,155
Latest member
carlosfusion